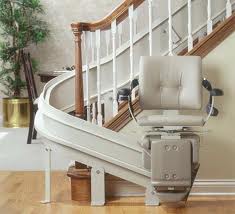
The Acorn Stair lifts Installation Guide is straightforward and detailed enough for the do-it-yourselfer or the experienced contractor. Once the acorn stairlift has been inspected to ensure all parts were shipped complete and undamaged, follow the instructions on the Acorn guide to get a long and safe service from the stairway chair lift.
Start by installing a battery in the remote and testing it by turning the keys in the switch. When the lift is plugged in properly, it will emit a steady beeping noise to let the user know it is powered up. Next, the seat box needs to be assembled. It is made up of several parts, which can be put together with a set of socket wrenches and screwdrivers. The installer should also have a utility knife, tape measure and level available.
Before beginning, inspect the railing to make sure there are no obstructions. Check for pipes, which may stick out, windowsills protruding into the stair rail space, newel posts or other obstacles. A skilled contractor can plan for these obstructions, or the acorn lifts can be adjusted to avoid them. When all permanent and removable objects are cleared, join the rails at the bottom of the stairs. This makes it easier to position and install.
 The Acorn Stair Lifts Installation Guide walks the user through connecting the rail cables (assembled at the factory) and proper positioning of the stair brackets. The ideal location for these brackets is top, bottom and the middle joint on either side. Setting the rail properly is vital to the smooth function of the stair chair. The carriage installs onto the rails via plastic end pieces, which must be positioned with care. Rough handling of the carriage could result in damage to one of the three micro switches located on the underside of the unit.
At this point, the seat’s angle must be set. The acorn stair lift instruction guide gives step-by-step details to the process of setting the seat post on the main carriage. Double-check to make sure no wires are becoming trapped as the seat is positioned, then fix it in place with a retaining bolt. When the instructions have been followed properly, the unit can now take a test drive to the bottom. The lift must now hook up with the motor drive pinion and ‘tooth bed’ rack on the rail.
With the acorn stair elevator at the bottom, it should locate the drive pinion with ease. The installer will want to perform a thorough inspection of the chair, the rails and all visible parts. The clearance of the lifts is adjustable as well. After inspection and the test run, proceed to tighten down the brackets, which were placed at top, bottom and middle. Once the area is prepared, fit the transformer kit to the charge station and the new stairway elevator will be ready to use soon.
Related:


